
Nine years ago, I published on the blog the result of a Gengar amigurumi that I made following Mia HandCrafter's pattern. It's a great pattern, but I remember it took me a long time to crochet it, and something that was very challenging for me was to achieve a believable needle felting mouth. Gengar is a ghost Pokémon and is not solid, but gaseous. Therefore, making it as an amigurumi is very complicated.
However, Gengar is one of the most beloved Pokémon, and people want its version in amigurumi. So, I have decided to try making a new pattern, which completely simplifies two aspects: the back full of spikes and that the eye and mouth details are not added with felt, but crochet pieces.
Materials
Yarn of approximately 2mm in various colors:
- White
- Violet or purple
- Black (only a small amount is needed and it can be of a different thickness)
- Darkish red
Crochet hook for 2mm yarn
6mm safety eyes
Additionally, as always, you will need a tapestry needle, stuffing, scissors...
Video help
I have created a video focusing on the details that I believe are the most complicated. For example, the body is a simple amigurumi ball, so I didn't record myself during that process.
Pattern
Eyes(make 2)
It's unusual to start with the eyes, but trust me, it's necessary to make them before the body.
Note: Instructions within parentheses "(" and ")" should be performed at the same stitch from previous row.
In red:
- Chain 4.
- DC, (2 DC), SC

Eyes scheme
Close with a slip stitch and tie off any loose ends with a simple knot. Watch it in detail in the video if you have any doubts.
Use a safety eye and place it in the middle of the piece to create the pupil. The initial chain part is the top part of the eye. The drawing is not the best in the world, but it should look something like this:

Eye shape over the diagram
BODY:
The body is a simple amigurumi ball. In violet or purple:
1. Magic ring (6)
2. [INC] (12)
3. [SC, INC] (18)
4. [2SC, INC] (24)
5. [3SC, INC] (30)
6. [4SC, INC] (36)
7-14 [SC] (36) You should insert the eyes between rows 7 and 8. I have placed a separation of 5 stitches, but it could be 4.
15. [4SC, INVDEC] (30)
16. [3SC, INVDEC] (24)
17. [2SC, INVDEC] (18) Make sure to stuff enough and insert the eyes before closing completely.
18. [SC, INVDEC] (12)
19. [DEC] (6)
20. Close with slip stitches.
Sew the red part of the eyes to the body, remember that Gengar has squinted eyes, keep that in mind.
Ears (make 2):
I'm not sure if they are ears or horns, but here it goes. In violet or purple:
1. Magic ring (4)
2. [SC] (4)
3. [INC] (8)
4. [SC] (8)
5. [SC, INC] (12)
6. [SC] (12)
7. [2SC, INC] (16)
8. [SC] (16).
Close and cut, leaving a tail for sewing. Make 2. Sew them to the body at the top, aligned with the magic ring.
Arms (make 2)
In purple or violet:
1. Magic ring (4)
2. [INC, SC] (6)
3. [INC, SC] (9)
4. [2 SC, INC] (12)
5. [INC, 3 SC] (15)
Sew them to the side of the body, ensuring they don't exceed the height of the eyes.
Leg 1
The legs are identical, but they change at the end. In purple or violet:
1. Magic ring (4).
2. [SC, INC] (6)
3. [2SC, INC] (8)
4. [3SC, INC] (10)
5. DC, DC, DC, DC, 2DC.
Leg 2
The legs are identical, but they change at the end. In purple or violet:
1. Magic ring (4).
2. [SC, INC] (6)
3. [2SC, INC] (8)
4. [3SC, INC] (10)
5. Chain 1. Turn the direction of the crochet. You have to go in the opposite direction from what you've been doing.
6. DC, DC, DC, DC, 2DC.
Sew them at the base of the body, the part you made in step 6 should be facing outward so that the calves are smaller than the outer thigh.
Feet (make 2):
They are simple to make, but watching the video will probably make it clearer.
- Chain 3. Join with a slip stitch to the first chain stitch.
- Another chain of 3. Join with a slip stitch to the first stitch of the second chain.
- Another chain of 3. Join with a slip stitch to the first stitch of the third chain.
Join the last stitch to the first with a slip stitch.

Feet scheme
Make two. Sew them at the end of wach leg.
Mouth
Video details this process step by step.

Esquema para la boca
In white:
- Chain 15.
- From the second chain stitch, work one stitch in each stitch:
- SC, DC, DC, DC, DC, DC, TRIPLE CROCHET, TRIPLE CROCHET, DC, DC, DC, DC, DC, SC
- Fasten off, leaving a tail for sewing.

Diagram showing how the mouth looks.
The chain part is the upper part of the mouth, it should be sewn to the body under the eyes, trying to give it a curve to have a sinister smile. Using black color, sew vertical lines along the mouth to create divisions for teeth.
Large Back Spike Row
The video details the process step by step. Gengar's back features a lot of spikes or horns. To avoid making each one individually, I simplified them with three rows of flat crochet. This is the largest row and should go in the middle.
Note: Instructions within parentheses "(" and ")" should be performed at the same stitch from previous row.

Diagram of Large Spike Row
In purple:
- Chain 10.
- [(SC, DC), (DC, SC), SLST] * 3
Fasten off, leaving a tail for sewing.

Diagram of the large spike row.
The idea is to have three "spikes" in the piece. It should be sewn onto the back of the body as centrally as possible.
Small Back Spike Row (make 2)
Parallel to the large spike row, we will make two rows of small spikes, one on each side.
Note: Instructions within parentheses "(" and ")" should be performed at the same stitch from previous row.
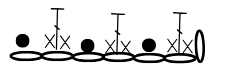
Diagram of Small Spike Row
- Chain 7.
- [(SC, DC, SC), SLST] * 3
Fasten off, leaving a tail for sewing.
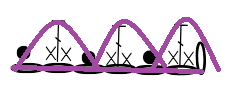
Diagram of the small spike row.
They should be sewn onto the back, next to the large spike row, vertically centered.
Tail
I like this size because this way, with the little legs and tail, it stands on its own. In purple or violet:
1. Magic ring (4)2. [SC] (4)3. [INC, SC] (6)4. [2SC, INC] (8)
Sew them as centered as possible to the body underneath the spike rows.
I like this size because this way, with the little legs and tail, it stands on its own. In purple or violet:
1. Magic ring (4)
2. [SC] (4)
3. [INC, SC] (6)
4. [2SC, INC] (8)
Sew them as centered as possible to the body underneath the spike rows.
Final considerations:
What do you think? Would you change anything? Although I tried to simplify the Gengar pattern, I feel it remains a demanding amigurumi pattern. It has quite a few independent pieces, and the result is still not perfect. Are you encouraged to try the pattern? Let me know your thoughts.


No hay comentarios:
Publicar un comentario